Category Archives: sewing and crafts stuff

New Embroidery project/class

I really tried to keep this simple. Really!

It was to be an apron with some embroidery on it. But well, as I started making the apron after digitizing the embroider work and stitching that part out, I just could not stop. At first the embroidery piece was to be the bib. Then, it was just to have a straight skirt, no ruffle. Well, the embroidery piece just needed more and a straight skirt was so boring. AND I had this cool fabric but wanted to do it justice.

So, it ended up with two layers of skirt, two ruffles, one on each layer. Two layers are on the bib, the embroidery piece that was backed and then the bib it was sewn to. BUT you don’t have to make this that way – you could just sew it with one skirt and no ruffle, or one skirt and two ruffles, or maybe one skirt and one ruffle. You could just make the bib out of the embroidery piece and not worry about two pieces to the bib. But, of course, it will look cuter if you do the whole thing. LOL

Here are the pics. As you can see, it really needed it ALL! and OH, I also made another embroidery design for an alternate. Personally, I like the second one better, but thought the first one would go over better.


June apron


June apron, Scrappy Cats


Bee Happy Machine Embroidery, Scrappy Cats Designs

Download the embroidery files and instructions by clicking on the words below

[download id=”910″ template=”image”]

Files included in the download include: ART, EXP, PES, HUS,SEW and directions on how to make the apron


Finally Finished

It sat there in my sewing room like an accusation, It was pointing a shaming finger at me. I started a quilt top in March at a retreat and got most of it done, but then could not find the time to finish it. I will never again wonder how people have quilt tops stacked up waiting for attention. Now I know how it happens.

When I got home from the retreat, it took the rest of the month to get caught up. Then it was time to get ready for the next month. And that is how it goes. While finishing up one month, I have to get ready for the next month’s classes. They all involve making class samples and the embroidery one takes at least a week to work up.

So I finally was able to get some time carved out to work on the quilt I started in March. I really like how it came out. The back is especially cool. Though I did not take any photos of it. Here is the front, all quilted and ready for the bed.

endsFrench braid quilt - Moving On by Scrappy Catscenterbottom triangles


Potholder from Red White and Blue Day

Yep, up to my old usual tricks and taking so long to get back to you all. This time, my excuse is I had to rewrite the instructions for the potholders that I promised. I am so sorry to the ladies who took the class and had to suffer through my errors. Disclaimer here – -these new instructions have NOT be tested by anybody but me, so if you find mistakes please let me know.

Here is one of the potholders that are made using these instructions. If you don’t have a embroidery machine, you can just put a pretty print in where the embroidered heart is.To go to the download page, click on the link below it. The download is not hosted on any commercial site, so you won’t have to wait for downloading or whatever.

Oh, and the other potholder has a star in the center. The instructions give supplies needed for two. Also, the embroidery files that are included are in the following formats: ART, EXP, HUS, PCS , PES, PEC, SEW – -I don’t know what machines will work with what formats, so just included all the formats I could make.


Click here to download instructions.

Time to get moving!

After being ill for too long, I have decided to just ignore it all and move on. Oh, don’t get me wrong, I am following doctor’s orders and keep working on a remedy. But I am just plain tired of being ill and giving in to it.

So lets move one!

Recently I taught a class at the store that was called Red, White and Blue. I thought I would post some pics of the samples here that I made up for the class. In the next few days or weeks I will be starting to add patterns and the like for my blog readers. So. lets start it now.

Here is what I designed for this special Red White and Blue day. There are two potholders, two chickie pincusions, a crayon wrap up roll and a little patriotic butterfly wallet purse. I digitized the machine embroidery parts as well. I just love how that butterfly came out. Stay tuned to get these patterns free in the next few days.

Samples for Red White and Blue Day

Don’t exceed your grasp

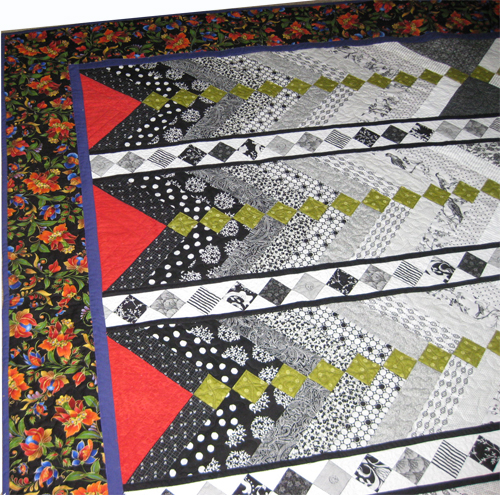
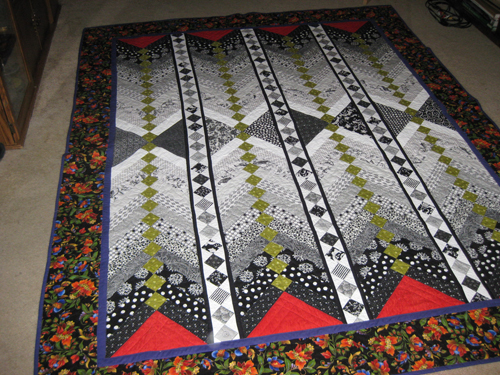
The past few years I have been working on improving my free motion quilting. It has been a journey and one I have not finished yet. I will know I have “arrived” as a free motion quilter when I can do feathers.

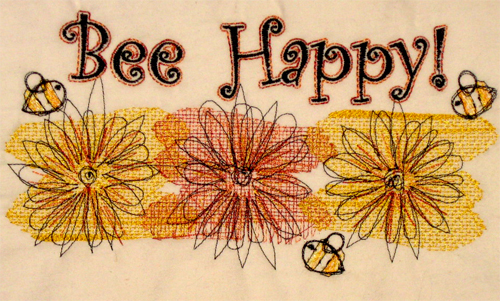
What are feathers? they are the utmost in elegance when machine quilting. I practice and practice so that one day I can make them myself. Here are a two samples I found on the web about feathers. There are plenty of pics out there, I even made a board for them on my Pinterest account.


But the thing is, they take practice and practice before perfecting.

One of the things I learned when working on my machine quilting was to make sure you have control of what you are sewing on. When I was using my little Magnolia Janome, that meant putting a table behind the sewing machine and a tv tray beside it to support the quilt. But, I just did not “get it” yet and would end up with sharp points and jagged lines where I had lost control and the quilt would pull out of whack. I was moving the quilt beyond what I could handle. Beyond my grasp one would say.

It got so bad, that one time I sewed the sleeve of my shirt onto my quilt. I just did not want to turn loose of the quilt and adjust my grip on it so I had my arm fully extended through the throat of the machine. It was kind of shocking to sit there and watch that needle go through my sleeve. Then, I was kind of stuck. I could not take the shirt off, I could not remove my arm from the sleeve and so I sat until I realized that no one was going to come and rescue me. I had to use my left hand, did I mention it was my right arm that was stuck in the sewn sleeve? Anyway, I had to use my left hand to try and cut the sleeve loose. Choosing between cutting the sleeve and the quilt, of course I chose the sleeve. It was a worn out shirt anyway. I got free, but learned about loose garments and the sewing machine.

My skills have improved now, and I don’t feel the desperate need to hold on the quilt until I could not move it another inch. I’ve learned to just try and control a little bit of the quilt at a time and I get much better results.

Isn’t life a little like that. If we desperately try to control every little thing we end up loosing control and things get damaged or destroyed in the process. It takes maturity and a little trust to let people and situations work themselves out without us trying to control every little part of it. I had to learn how to trust my needle to go up and down and do its thing and just worry about the piece of the quilt that was under it at the time. I could not control the whole quilt, I had to just concentrate on just that part of it that needed my attention.

In my life, I have had to learn how to just let some things go and not worry about them. That does not mean that I wash my hands of the situation, or that I remove myself, it just means that I should just enjoy myself and let others do their job and handle their own responsibilities.

Of course, I am still learning how to let go. It probably is one of those things that we all will struggle with for our entire lives. Once in a while I just need to step back and give myself a talking to about it.


Finally finished the silly thing

Why is it when I have a project that should be straight forward and easy to do, it will consume my time voraciously for days on end?

But, I finally finished this project! The All About ME class I teach at the end of the month is doing a casserole carrier in May. Of course, I need to make one ahead of time so people can decide if they want to take the class or not. It did not help that the class was supposed to be taught using a hat pattern or a slipper pattern. Neither of these would really go over very well. So I decided we could make coasters with a little fabric box to hold them and the embroidery we did would be on the box. Well, after stitching out the embroidery work twice, I realized that there was no way that this would work with the design given for the class. So, finally I decided to do a casserole carrier.

Making a casserole carrier should be easy. It is two lengths of fabric that are sewn together like a plus sign. Right? Wrong. You have to figure out how to do this and that and no binding as we have done binding in just about everything we have made for the past year. I feel like I made three of these from all the ripping out and restitching I have done this past week. I scheduled ONE day to make this once I got it all figured out and ended up spending three days on it. But it is done! and I think it really looks nice.

Postcards

This past month I have been working on stitched postcards and was able to come up with some very cute ones. To be sure they could be mailed I too them to the Post Office and they were mailed back to me, going through the machinery, etc. I told the clerk at the Post Office I needed to test them so instead of putting the cards in the local mail collection box, he put them in the box that sent them to Waco. They came through with flying colors!

Here is the fish one that I really love. To make those bubbles, I put a piece of tulle over the area, free motioned/stitched those little circles and then cut the excess tulle away. The pattern for this fish comes from EQ (Electric Quilt) a software program that helps me design quilts.

fish postcard

                                                                                                                                                                                                            The grey kitty cat was a graphic that was simple enough for me to duplicate by just tracing over the different shapes of his body.The white cat is a paper piecing I reconstructed from a photo someone posted on the internet of their postcard.

cat postcardpaper pieced postcard


My first try at felting

It has been at least a month since I purchased the felting tool for my sewing machine, maybe even longer. Finally, I decided to just have a “me” day and not worry about what projects needed work. The one thing that I really wanted to do was start an Art/Sewing Journal. It was to be something that I could add to when the mood struck and when the time permitted. So, my first page in this journal was to be a felting project, as I had just seen something on the Quilting Arts show that I wanted to try. You can see the project at: http://www.quiltingdaily.com/media/p/29241.aspx

So I figured it all out and got the machine set up for felting using the tools I had purchased and made two trial pieces. Wow, it is cool! So then I made a bigger piece for the journal that is in my mind to start and well, I just could not let it sit somewhere inside a book. A different project that had been in my mind came to the surface and away we go. I had wanted to try making a cover for spiral bound items using a ruffle to cover the spiral. That part turned out Ok, but then there was the problem of this cover just not staying on since it has to be loose for opening and shutting the notebook. So then I added ties to the top and bottom front and back and tied the cover on through the holes in the cover. (I tried tying it to the spiral rings, but then it interfered with opening and closing the notebook.)

I still have some other ideas to try –on little books, I think I can just sew the cover on along the edge through the cardboard cover since they are so thin. But, make some other ways of keeping the cover on and making it removable can be thought up.

Here it is, my first felting project.

Felted Journal Cover


After felting the piece of wool, which is red in color, I added machine stitching and then some embroidery work. Because ribbons and pieces of fabric are added it is hard to machine quilt using free motion as the foot gets caught in those layers. Here is the back of the journal cover – you can see that I stitched with gold thread – the front is too but it does not show up very well.

Journal cover back

I’m addicted!

Ok so I saw these on Pinterst and just had to try making some. Everything that was needed to make them was here. After making about ten of them, I realized that I could not stop. After making a purchase yesterday at Hobby Lobby of felt in ten different colors, I decided to just go with the flow and have fun with them.

They are pin cushions made using the bottle cap off those liter bottles of soda -in my case of Zero Coke (gotta give credit where credit is due). Every little stitch is done by hand, no glue, no sewing machine work. The object for me is to explore how cute these things can be.

Bottle cap pincushions


So, yes I am on Pinterest. Soon I might even take the time to put my link in the sidebar, but if you don’t want to wait, my Pinterest Boards may be seen at:

http://pinterest.com/nlwilkins/


Trash Digger – that me’s

I have not mentioned the new sewing machine I got – -it is a super, super machine. Actually it is an embroidery machine as well as sewing machine and I have fallen in love with it.

BUT, it takes a different type of feet than all my other sewing machines that I have ever had. AND today I could not find the one that is going to be my main man. I looked high and low for it. You can probably guess where this is going. Yep, I had to go out to the street to dig in the trash to see if it was there. Of course, all the neighbors chose that time to drive by. There had not been a car on the street until I stuck my head into that trash can. Thank goodness there was not much garbage in the trash can or I would still be there digging in it. But, I found the foot after just a few minutes. The foot is expensive so I just did not want to blow it off and get another one.

But this makes me think. How many people in our lives have we mislaid or inadvertently tossed away? Do we just keep the ones who are expensive or hard to replace? Or do we make an effort even when there is nothing in it for us? What about those people who “cost” us time and much energy to keep in our lives? the ones who seem to be so needy? We all know somebody like that – who is needy. They need support and attention or they get real out of shape. They might need constant verification that they are important to use and that we approve of them. Or what about those people who are so busy in their lives but want to be friends. They are hard to be friends with because it has to be on their schedule and their time line. Do we forget to make an effort to be friends with people like these or do we inadvertently toss them in the garbage and move on? Just a thought. As for me, guess I will just have to keep the name of trash digger as I liketo go back and get those people out of the trash that I inadvertently tossed away.


Oh here is the foot that was so much trouble to me today – You can see part of the quilt that I am just finishing up.

« Older Entries Recent Entries »