New Year, maybe new leaf?

I am posting it here that I want to be better at blogging. Yes, you hear that all the time from lots of bloggers and then nothing changes. Let’s see if I can change a little.

To start the new year, we had an awesome dinner. Hubby put a ham in the smoker and I made homemade yeast rolls in addition to frying up some cabbage and opening up a can of black eye peas. Oh, and we had corn bread as well. It was an awesome meal and I totally ate too much!

New Year's Dinner

YUMMY

Let’s see if I can get it right. The black eye peas are for money, the corn bread for gold, cabbage for green cash – then add in the yeast to make it all grow and perhaps we might have a prosperous year –LOL


Retreat Goodies

I just love going to quilting retreats. I get so much done and have a lot of fun. When I go to a retreat I like to make a little something for the other participants. It adds to the fun for me.

In March I made these needle books that really were more work than I should have done, but I loved how they came out. All the ladies loved them.

marchretreatgoodies1marchretreatgoodies

The inside pages consist of a whole page of felt and one of linen. I added a aida cloth square to hold needles and then a fancy trim and buttons for holding some pins. They were really not too hard to make, I just would do it differently next time.  I made 28 of these little gifts, but did not need but half that many in the long run.

Can You See Me?

e

canuseeme1Demona found a cool hiding place that had us worried cause we could not find her. When Will finally found her it was pitiful how she did not want us to pull her out. Can you see her in that mess? I cleaned it up later so she could not scare us again like that.

If you can’t find her, click here for a clue.

By the way we still are looking for a good home for her. She is living in our guest bedroom now and seems quite content. But it is not the happy situation we wanted for her. She is so sweet when I go in to love on her. She purrs and rolls over to get belly rubs. She even lets me pick her up and hug her. I moved, purged and fixed the room so she has a window to sit in and sun bathe. But my heart hurts when I think of what it could have been like to have her running and playing with the other two.

Babies!

babybibs

It seems like we are having babies everywhere! At least on my side of the family. This year we are adding a total of four babies, three girls and one boy. The nieces and nephews have been busy!

Anyway, as the the self-designated quilter in the family I had to get busy and get some stuff done. Two quilts have been completed and mailed and now two more to do. One is in the works and almost done, the other is not really needed for another four months.

But quilts are not enough don’t you agree? So I got out the embroidery unit and worked up a batch of bibs. They were kinda fun to make, but I have already figured out a way to make it easier. (This coming month at the Sew and Quilt Club watch for a quickie way to make bibs! -will post here later about it.)

My favorite is the funky chicken bib. You can drop that into the deepest diaper bag and still be able to find it!


T-Day Tips

You can never have too many pincushions!

There should be a pincushion everywhere you go with your sewing.

  • Your cutting area
  • At the sewing machin
  • the ironing board
  • by your recliner for when you do handwork
  • by the washing machine

Need I say more?

I bet you can thing of other places as well. And while I am on the topic of pincushions, you need some for needles as well. See the fishie pincushion in the pic below? I use the fins and lips for needles. The green pincushion could have a felt leaf or two under the button to hold needles, but the ball pincushion pattern would not have a place for them. Just something to think about.

Pincushions

T-Day Tips

This is a simple tip, one that many of you all will probably already use. But I find it bears repeating.

A little back story first. Recently I was gifted with some boxes of scraps and what-not from a friend who got it from another friend who got it from a deceased relative. Each person had already gone through the scraps and taken what they wanted. So by the time I got them they were pretty picked over.

Part of what I found were blocks half done and others cut out and projects that were all ready to go. But, there was no way to figure out what was in the mind of the quilter as nothing was labeled or in any particular order.

This severed as a lesson to me. There are times when I come back to a project that I have to spend an hour or more figuring out what I had in mind when I started the project. Shoot, I don’t even have to be away from the project but a night and it takes time to work it out.

So my tip today is to keep note pads handy in your sewing area and to USE THEM for labels. Mark down dimensions, make a project note with name of pattern and fabrics being used and for what parts of the project. Make your life easy by keeping track of your projects.

label your parts

My Lion Bag

Strip Bag

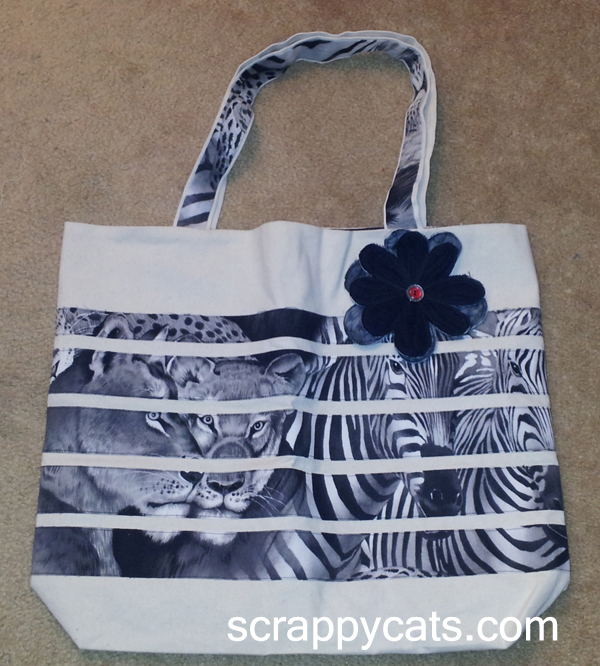
Here is a cool bag I made a month or so ago. I got the idea out of a Home and Garden magazine my sister gave to me. (thanks sis!)

I had some fabric that I just loved but could not figure out how to use it in the best way. Part of the problem is I did not have very much of it. It was acquired through a mystery box sale on Ebay. Then I saw this idea and I love how it turned out.

Home and Garden said to fuse strips to a ready made canvas bag, but I wanted something a little bigger than what was available. Plus, I did not really want to spend anymore money on fabric at that time. Since I had some canvas on hand, I made the bag myself which meant I could also line the bag too.

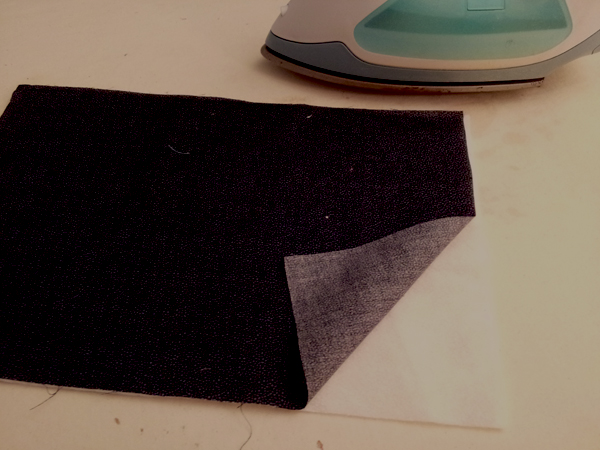
First, you apply two sided fusible your fabric that you are going to strip. I used heat and bond, but you could also use wonder under and other two sided fusible. It is important to fuse first and then strip. Though if you forget, it can be applied afterward, but it would be a lot harder.

Once the fusible is on the fabric, cut it into strips anywhere from an inch to two inches wide. Cut the strips across the width of the fabric and keep them in order as you cut.

Then cut the bag body out of your main fabric and fuse the strips to the body of the bag. You will need to leave enough room on the bottom of the bag body for the part of the bag that folds under to become the bottom of the bag.

How wide you cut your strips and how many strips you cut depends on several things. If you are making a small bag, you might want to make thing strips. If your strip fabric has large images or flowers, you might want to make wider strips.

When fusing be sure that the strips are straight and that they line up at each end, so the the beginning of the strip is even with the end of the strips. You will be sewing the back bag seam together and you want to have these strips match.

Once you have the  strips on your bag body, you can just sew up the bag in the usual way. Use a very simple bag pattern as you don’t want any seams or extra bag pieces to interfere with the impact.

I added a simple little flower to add a little zip to the bag and then it was done.

Flower for Bag

T-Day Tips

Fusible Fleece

Another tip for you all.I wish someone had clued me in to this little tidbit. I had to resort to reading directions and working it all out myself. It’s about using fusible fleece and the second tip will apply to some other fusibles.

The biggest thing to remember is the fact that it takes a lot of patience for fusing your fusible fleece. You need to hold the iron on the fabric for at least 10 seconds. Count it out, one thousand one, one thousand two, and so on. Ten seconds for each portion of the item being fused. You can’t rush this and must be sure to get every portion of your item fused. After the first part is fused check to make sure it is sticking. You might even have to hold the iron on for longer.

The next thing to remember is to fuse the fleece to the fabric by holding the iron on the fabric side and not on the fleece side. Think on it, fleece is used as an insulator and inhibits the flow of heat or cold through it. So it would not let your iron work at its best if you tried to fuse the fleece to the fabric by ironing on the fleece side and not on the fabric side.

Another thing you might want to think about is using a telfon ironing sheet or applique sheet to help keep your iron clean. The glue on the fusible fleece can build up on your iron and then transfer to your work at the most inconvenient time – like when you are ironing something white. So cover any exposed glue side of the fusible with the teflon sheet. The glue will not stick to the sheet and will keep your iron clean.

T-Day Tips

As I was sewing tonight, it came to me that I could share some of my “wisdom” gained the hard way. So as I gain this wisdom, I am going to write little one or two paragraph tips. Hopefully, I will keep up with this and after I get I few going, I will create  a page with a list and links.

Today’s tip has to do with a special product I found through a friend. We were at a retreat and of course we had our tool boxes and supplies with us. Well, when it came time to rip the stabilizer away from our embroidery work, Sandy had these neat tweezers.

Uncle Bill's Sliver Grippers

They really are goo for more than pulling out those little pieces of stabilizer. They also are great for picking up all those little thread when you have had to rip out stitches. They fit into your hand without being bulky and come in a little tube to keep them from getting lost in your tool box.

Click on the pic to be taken to Amazon where you can purchase these.


PS: I am not being paid to advertise or anything like that

T-Day Tips

It came to me that I could share some of my “wisdom” gained the hard way. So as I gain this wisdom, I am going to write little one or two paragraph tips. Hopefully, I will keep up with this and after I get I few going, I will create  a page with a list and links. No, I don’t think of myself as some awesome genius or anything. It is just I have been sewing for over fifty years, have taught sewing for many years and have learned a few thing here and there.

Today is about using weights to hold your fabric when cutting. Do you constantly have to reposition your strips as you cut them up? perhaps you need to reposition your fabric as you cut the strips.

Most of us have heard of pattern weights, but I never really tried them. There was something about the idea of using weights to hold patterns to the fabric that did now seem so good to me. Perhaps it was the fact that once the pattern piece was cut out, the fabric and pattern would come apart and then you could not make all those tailor’s marks that were so important.

But when cutting for quilts we don’t usually even used paper patterns. We use the ruler and rotary cutter and cut over and over. Only it seems that each time we cut, the fabric moves and it then has to be straightened up again and again and again.

Well, I was not going to spend a lot of money on pattern weights, so I went looking at my favorite notions store – the hardware store. ACE Hardware has the neatest things and I love prowling through their aisles.

What I found were large washers. They were/are about four inches across and are heavy. Yet they slide smoothly when I need to move them. When I position a piece of fabric on my cutting board I place a few of these huge washers here and there on the fabric and that piece of fabric is not moving until I want it to. It sure saves me a bunch of time.

Huge Washer

« Older Entries Recent Entries »